Kasyno online to popularna forma rozrywki w Polsce. Wraz z rozwojem technologii, coraz więcej osób decyduje się na grę w kasynach online. Jednym z najpopularniejszych sposobów dokonywania płatności w kasynach online jest system Blik. W tym artykule dowiesz się, dlaczego warto korzystać z kasyna Blik. Kasyna online oferują szeroki wybór gier, takich jak automaty, ruletka, blackjack i wiele innych. Możesz cieszyć się grą w dowolnym czasie i miejscu, korzystając z komputera, smartfona lub tabletu. Kasyna online są dostępne 24/7, dzięki czemu możesz grać w ulubione gry wtedy, gdy masz na to ochotę. System Blik to szybki i wygodny sposób dokonywania płatności w kasynach online. Działa on na podobnej zasadzie jak tradycyjne przelewy bankowe, jednak jest o wiele szybszy i bardziej intuicyjny. Wystarczy, że posiadasz konto w jednym z banków obsługujących system Blik, aby móc dokonywać płatności w kasynach online. Kasyna online akceptujące Blik oferują wiele korzyści dla swoich graczy. Przede wszystkim, korzystanie z systemu Blik jest bezpieczne i poufne. Twoje dane osobowe i finansowe są chronione przed nieuprawnionym dostępem. Ponadto, płatności dokonywane za pomocą Blika są natychmiastowe, dzięki czemu możesz od razu rozpocząć grę. kasyno blik to doskonały wybór dla osób, które cenią sobie wygodę i bezpieczeństwo. Możesz cieszyć się swoimi ulubionymi grami w kasynie online, nie martwiąc się o bezpieczeństwo swoich danych. System Blik umożliwia szybkie i bezproblemowe dokonywanie płatności, dzięki czemu możesz skupić się na samej grze. Jeśli szukasz kasyna online, które obsługuje system Blik, zapraszamy do odwiedzenia strony pl.kasynopolska10.com/blik/. Znajdziesz tam szeroki wybór gier oraz atrakcyjne bonusy dla nowych graczy. Zarejestruj się już dziś i ciesz się grą w kasynie Blik!

In this step by step tutorial, we are going to learn how to build a real-time Android Chat application in Kotlin. Everything is going to take only a few minutes since we are going to reuse the full source code from our premium Android Chat App.

How to Build an Android Chat Application in Kotlin
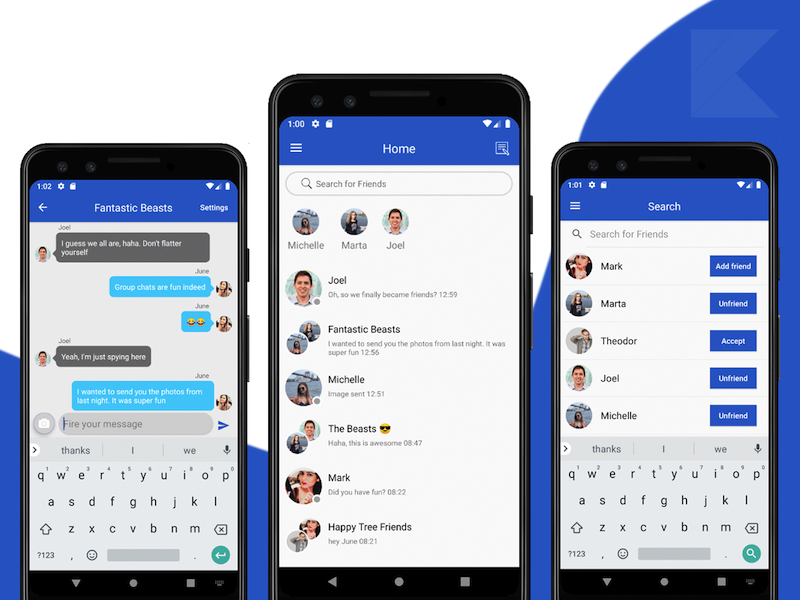
android chat application tutorial
In order to build a fully-fledged Android chat application, we need to include a series of critical core features, such as:

  • Real-time Messaging
  • Photo Messaging
  • Private Messaging
  • Group Chatting
  • Push Notifications
  • Messages Archive
  • Online Status

To implement all these awesome critical set of features, we leveraged Firebase backend. More exactly, we are using:

  • Firebase Auth for user management (think Login, Registration, Facebook Login, Google Login, etc).
  • Firebase Firestore – this is a real-time database where we store all the users and messages
  • Firebase Storage – this is used for storing the photos and videos that are being sent directly from our Android chat application
  • Firebase Cloud Messaging – this is used for sending real-time push notifications to all recipients of a given message

On a high-level, here are the steps that you need to follow in order to get started with our Android Chat application in Kotlin:

  1. Open & Run the Kotlin project in Android Studio
  2. Override google-services.json file with your own file (downloaded from Firebase Console).
    This will wire the chat application to your own Firebase account. Don’t forget to enable all Firebase Auth options, as well as Firebase Storage. For Firestore, you also need to make the read/write permissions public.
  3. Publish the app to Google Play Store

It looks pretty straightforward, right? We are going to give you a step by step tutorial on how to achieve all these milestones, including turning on push notifications. In this step by step tutorial on how to build a real-time Android chat application in Kotlin, we are also going to present a high-level overview of the source code structure, as well as common pitfalls and frequently asked questions.

Without further ado, let’s dive right into it.

Enable Push Notifications

In order for your Android chat application to be able to send real-time push notifications to all the recipients of a given message, you need to provide the correct Authorization key, which can be found in Firebase Console.

Head over to Firebase Console -> Your Project -> Project Settings -> Cloud Messaging and copy to clipboard the token of the Server Key. It looks like this

AAAAeliTfEs:APA91bGve5fyExjSiUCB0oI09Br1yGUSb0tPHelAk7L0FUytHWGOMlBPexJubTwSjjJTaIlK7oto3jDevoj9c5Q4Qalk6QEtQ9Y3tYfTxHD7OrmPZuVJjVGGciPBJXThG9QHCZQqx9Id

Now, in Android Studio, open AppConstants.kt file, which can be located under the Utils folder. Replace the SERVER_KEY field with your own authorization token.

Now re-run the project, and send a few messages to see whether the push notifications get sent.

Shopping Cart